Friday, November 9, 2012

"The Shortcut" Fall Ice Cream Sandwich

What a fun fall treat...

Snickerdoodle &
Pumpkin Ice Cream
Sandwiches
aka - "The Shortcut"

Pumpkin Ice Cream Sandwich
Inspired by Pennies On A Platter
a VERY tasty blog that 
you must check out!!!

OK, so here's the scoop on
"The Shortcut"...

The source of this post made 
HOMEMADE 
Snicker Doodle Cookies 
+
HOMEMADE 
Pumpkin Ice Cream

Which is super impressive. 
(I'm so not worthy!!!) 
And this is what makes her blog so awesome!
(again, you MUST check it out!)

But I must admit,
my busy life is not conducive 
to that kinda of time commitment!

Yet, I was VERY INSPIRED 
by the idea & discovered that 
my local grocery store bakery 
makes awesome Snicker Doodles 
& the freezer section sells 
yummy Pumpkin Ice Cream.

And thus,
"The Shortcut"
Fall Ice Cream Sandwich 
was born!


And it's delish...
ENJOY!

Sunday, November 4, 2012

Lobster Potpie


This recipe is amazing!!!

Lobster Potpie


  • Ingredients


    For The Filling

    • 4 tablespoons unsalted butter
    • 1/2 medium onion, chopped
    • 1 fennel bulb (8 ounces), halved, cored, and very thinly sliced, preferably on a mandoline
    • 1/4 cup all-purpose flour
    • 2 cups fish stock
    • 1/2 cup water
    • 1 pound cooked lobster meat (from 2 lobsters), cut into 1-inch pieces
    • 3/4 cup fresh shelled or frozen English peas
    • 3 tablespoons heavy cream
    • 1 tablespoon fresh tarragon
    • Coarse salt and freshly ground pepper
  • For The Topping

    • 4 tablespoons unsalted butter
    • 6 slices Pullman bread (1/2 inch thick)

Directions

  1. Preheat oven to 375 degrees. Make the filling: Melt butter in a large pot over medium heat. Cook onion until translucent, about 7 minutes. Add fennel, and cook until softened, about 7 minutes. Stir in flour. Add stock and water. Bring to a simmer.
  2. Remove from heat, and stir in lobster, peas, cream, and tarragon. Season with salt and pepper if needed. Let cool. Transfer mixture to a 9-by-12-inch (8-cup) gratin dish.
  3. Make the topping: Melt butter, and brush over bread slices. Tear each slice in half, and arrange over top of filling to cover the surface, overlapping as you work. Bake until bread is golden brown and filling is bubbling, about 30 minutes.


HINT: 
I got my lobsters at Costco
(they are good quality at a cost effective price!)

Such a 
wonderful dish!!!

Monday, October 29, 2012

Fall Garden Party

This 
Fall Garden Party 
is so inspiring!!! 
(and if you live in a warm weather state
 it is so do-able... well into fall!)


Although I found this on a wedding blog, 
I have to say, this could be adapted 
into a wonderful fall birthday garden 
party or even a Thanksgiving celebration!

Either way, 
you must admit, this is...
Breathtaking!

Fantastic job 
Wedding Chicks
you are amazing!

Friday, October 26, 2012

Pumpkin Craving Party

Looking for something 
fun & fall-ish 
to do this weekend??

Well, I've got the answer!
You should have a...

Pumpkin Carving Party 


Pumpkin Carving Party
on the front porch

To Eat:
- Apple Cider
- Mugs with Cinnamon Sticks
- Sweet Treats - like sugar cookies
- Healthy Treat - like apples & trail mix

To Carve:
- Pumpkins
- Carving Knives (cheese knives work great)
- Big Spoons (like wooden spoons)
- Sharpies Markers (for sketching on your design)


There are 4  FREE Printable 
Party Invites available, 
just click this link:


Tool of the trade...


Ya just can't carve without 
Apple Cider...


The good news is that you probably 
have most everything you need 
for this party in your home right now. 

With a quick trip to the store, 
you'll be set for some 
fall family fun!!!

Thursday, October 11, 2012

Sunday, September 9, 2012

Homemade Pumpkin Frozen Yogurt!


Homemade 
Pumpkin
Frozen Yogurt

Best of all only 4 ingredients

Pumpkin Frozen yogurt Skinny Halloween Treat: 4 Ingredient Homemade Pumpkin Frozen Yogurt
from Babble


1 cup nonfat vanilla yogurt, strained

1 cup pumpkin puree

1 tablespoons granulated sugar

1 teaspoon pumpkin pie spice


Mix everything together in a large mixing bowl
until completely combined. Churn the mixture
in an ice cream maker for a few minutes until 
it is a smooth, cool consistency. 

Alternatively, place the bowl in the freezer 
and stir mixture every half hour until it 
reaches desired consistency.


I love fall...

Saturday, October 22, 2011

Caramel Apples

It's Caramel Apple Season...


These "rustic" mini caramel apples 
from My Paper Crane are fab!

And I love this 
"DIY Caramel Apple Kit"


Isn't that wonderful?!

Monday, October 17, 2011

Funky Pumpkins

Decoupage Pumpkins...
What will they think of next?!

from Funky Time


Click on over to Funky Time get the step by step tutorial on how to recreate these awesome pumpkins. Sybille is ah-mazing & she shares all sorts of fun ideas to decoupage your way into a very fun fall!!!

Sunday, October 16, 2011

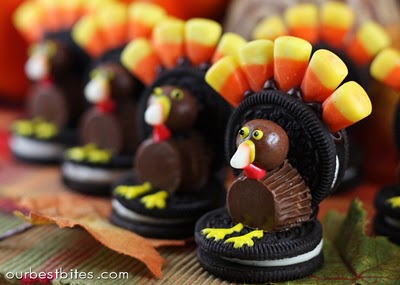
Fall Kid Craft

I love these little 
eatable turkey's...


Ingredients/Supplies
Double Stuff Oreo Cookies
Candy Corn
Whoppers
Peanutbutter Cups
Chocolate frosting
Yellow Frosting
Optional: Red frosting
Optional: black sprinkles for eyes

Here's a simple
"Photo Tutorial"
Step #1
Step #2
 Step #3
 Step #4
 Step #5
 Step #6
 Step #7

And aren't these the cutest 
little place card holders!

If you want more details on how to create these little cuties, I highly recommend that you click on over to Our Best Bites to get every morsel.


More fall fun to come....

Thursday, October 13, 2011

Easy Fall Decor!

Yesterday's post featured a few easy Christmas decorating ideas... 
It seems only fitting that I also include some simple fall decorating ideas today!
from Shanty-2-chic


from Daily Diva Dish

Create a "Thankful Tree"...
from flickr

And gourds provide endless possibilities...


I know it's backwards,
Fall comes before Christmas, 
but that's just how I am sometimes...

Have a great day!

Friday, September 30, 2011

Yummy Homemade Caramel!

Homemade Caramel
 is one of our all time favorite 
"sweet treats"...
My husbands family has made it for years 
& we continue the tradition today.


It's easy to make, absolutely delicious 
& it makes a wonderful gift!

~ Here's How to Make It ~

Get a can of sweet condensed milk. 
Take the label off, put into a pot and cover with water. 
You can do 1 can or up to 6 cans at a time.
Boil for about 2-5 hours depending on what consistency you are looking for. Yes, I know, it's a long time... 
but it's so worth it! 
  • For a pourable "Sauce-like" consistency = boil for 2 hours 
  • For a Caramel "Dipping" consistency = boil for 3 hours 
  • For a thicker "Pudding" like consistency = boil for 4-5 hours 

~ The Trick Is ~


Be sure to keep the cans covered with water the whole time! Otherwise, the cans can explode & you'll have a mess!

  • Just set a kitchen timer for every 15-20 minutes to check the water level to insure that the can(s) covered and it's at a consistent boil...
  • Once you're done boiling, just set the can on a rack to cool down. Do not open while hot!
  • If unopened, you can store the cans on the shelf for a few weeks. If opened, store in the fridge in an airtight container. 
  • The best part is, this can be made ahead of time, so you can have it on hand through the fall/holiday seasons!  


~ BONUS ~


Go to This Crazy Life to get these wonderful FREE downloadable labels to wrap your cans & create gifts! 
 HALLOWEEN...

 FALL HARVEST & THANKSGIVING...

 CHRISTMAS...

or for any special occasion!


So yummy & so fun...

Related Posts Plugin for WordPress, Blogger...
 

BLOG DESIGN BY DESIGNER BLOGS